Are you planning on making a great WordPress eCommerce website? That’s great!
WordPress has always been a giant in the website building arena. In fact, over 30% of the websites on the internet are made on WordPress, summing up millions of traffic every single day.
Creating a WordPress eCommerce website isn’t difficult but it’s surely a lengthy process.
In this guide, I’m gonna equip you with enough knowledge so that you can create your perfect website following up with 10 little steps.
Along with this, I’ll also leave a few tips and tricks to make the setup process simple for you.
So let’s get started!
Table of Contents
Here’s A Simple 10 Step WordPress eCommerce Tutorial for You
Step 1: Choose A Short and Catchy Domain Name
Your domain name is one of the first things your visitors will notice about your eCommerce website. Here are a few points you should keep in mind as you pick your domain name.
Pick a Synonymous Domain Name
Mostly, you should aim to pick a domain name that is the same as your brand name. A misleading domain name is a red flag to your potential customer. If they don’t trust your brand’s credibility, they would just move on to purchase from one of your competitors.
Tap Into Customer Psychology
Every language has words that are associated with positive or negative emotions. To pick a great domain name for your WordPress eCommerce website, you should choose words that trigger emotions like awe, happiness, sadness, etc.
“People don’t buy goods and services. They buy relations, stories, and magic” – Seth Godin
Keep it Short
A good rule of thumb for your WordPress eCommerce store is that your domain name shouldn’t exceed 12 characters. Your visitor’s brain memory wouldn’t really appreciate domain names like nylathenecklacebrand.com or booksthebookstore.com.
Keep your domain name short and simple whenever you can. Even if the domain name exceeds 12 characters, make sure the words used in the domain name are catchy.
Precautions to Take While Choosing A Domain Name
- Numbers: Don’t use numbers as a filler in the domain name. For example, hola5bookstore.com or necklaces5avenue.com
- Dashes: Your visitors wouldn’t remember where the dash goes and this would create confusion
- Ambiguous extensions: .tv, .flowers, .biz, .dresses are all extensions that create distrust around your eCommerce website – your best bet would be a .com
You can easily check domain name availability on Whois Lookup for your WordPress eCommerce store. Once you pick one, purchase your domain name from popular providers like NameCheap or GoDaddy.
Step 2: Select A Good Hosting for Your WordPress eCommerce Store
A web hosting platform rents your WordPress eCommerce store a spot in the online world. Most good hosting providers offer features like payment processing services, SSL, shopping cart software, and much more.
There are multiple eCommerce web hosts you can choose from. Here are 3 top factors you should consider before choosing your eCommerce web host:
Budget
Remember, choosing the cheapest provider isn’t a great option in the long run. Although shared hosting services may seem cheap in the short run, there are several disadvantages like low bandwidth, increased hacks vulnerability that you should be aware of.
Generally, you look at all-in-one hosts because they provide premium packages with powerful features and affordability. Although such plans save you money, they burn your website down with the slow loading speed, frequent time-outs, and a bunch of errors that even I don’t know about.
Customer Support
If you don’t have an IT team in place, you would need good technical support from your hosting provider. Besides, you will also need a high level of support to maintain your site and other troubleshoot issues.
Your best bet would be those hosting providers that offer live or quick customer support over those providers that make you raise tickets and wait for hours in queues.
Security and Data
Choose trusted hosting providers that are known for maintaining high levels of encryption and security. As you know, you don’t want to focus on security issues while managing the actual business. If you keep thinking about security, when will you take care of the business?
Now that we know the important considerations revolving around picking your hosting provider, let’s have a look at the top 3 hosting providers I’ve been good with so far.
Top 3 Hosting Providers You Can Get Online
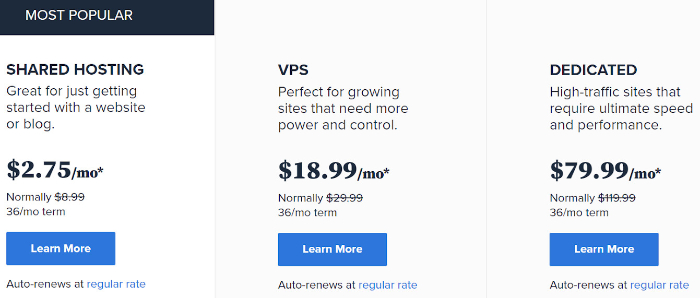
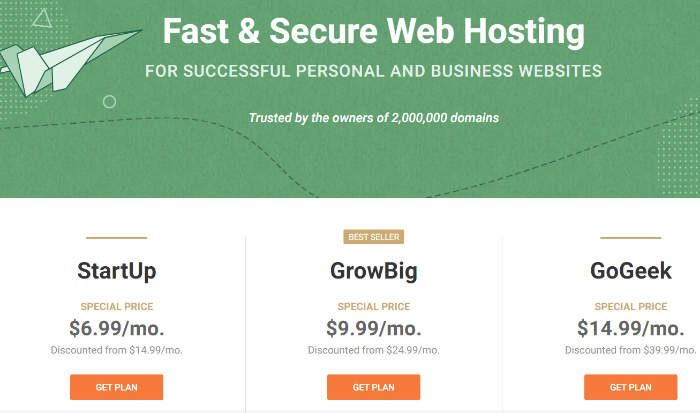
BlueHost – The God Hosting
BlueHost and WordPress go like cookies and milk as the hosting company boasts how the top WordPress eCommerce website examples use it as their hosting provider. As a matter of fact, it’s packed with powerful features for WordPress eCommerce stores.
Its notable features include:
- Free domain for one year
- Microsoft 365 access
- Automatic WordPress installation
- Automatic WordPress updates
- Secure login credential configuration
Here’s BlueHost pricing:

SiteGround – An eCommerce Friendly Hosting
SiteGround is known for its eCommerce-friendly plans that include eCommerce optimized servers and free shopping cart installation. It hosts multiple server locations, ensuring the fastest site speed for your WordPress eCommerce store visitors worldwide. On the other hand, unmetered data transfer ensures scalability for your site growth.
Here’s a gist of its most important features:
- The uptime guarantee is around 99.98%
- Advanced spam protection
- Auto-installation
- Let’s Encrypt SSL certificate
- 30-day money-back guarantee
Here’s an overview of SiteGround’s pricing:

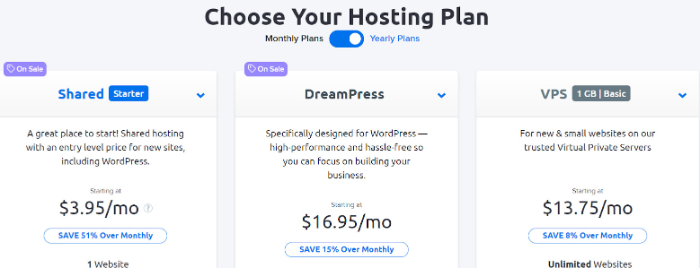
DreamHost – Unlimited Traffic for Any Plan
DreamHost offers unlimited traffic on every plan, so your WordPress eCommerce store won’t be charged for exceeding a certain amount of bandwidth.
Here are some of the most notable features of DreamHost:
- DreamHost provides free daily backups with all of its plans
- Domain names are free for the first year when you register a .com, .org, .club, .net, or .info domain
- Unlimited email is offered on every plan except for the Shared Starter plan
- Free SSL certificate and malware remover
DreamHost pricing is as follows:
Note: There is a hosting plan offered in WordPress eCommerce pricing plans, so give it a check before deciding which hosting provider you should pick.
Now that we’ve seen the top 3 hosting providers let’s see how can we install WordPress!

Step 3: Install WordPress from Your Hosting
You can install your eCommerce WordPress website in 2 ways:
- One-click Installation
- Manual Installation- Download WordPress and upload it to your hosting account
One-Click Installation
A Pro Tip: You should typically pick such a hosting provider that offers one-click installation. After signing up with a hosting provider, you can go to your hosting dashboard and easily click ‘Install WordPress.’
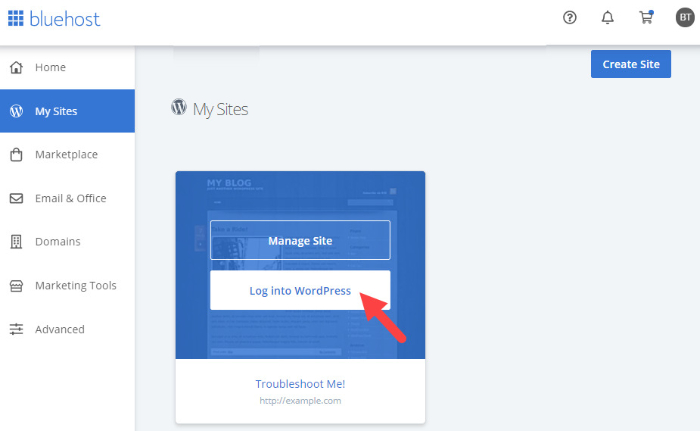
Here’s an example from BlueHost:
- Open your hosting dashboard and click on My Sites. Next, you will see the option to ‘create site.’

- Click on the ‘Log into WordPress’ button to access your WordPress eCommerce website.
- Add in the required details. You can always change the Site Name and Site Tagline later, so don’t worry about it much.
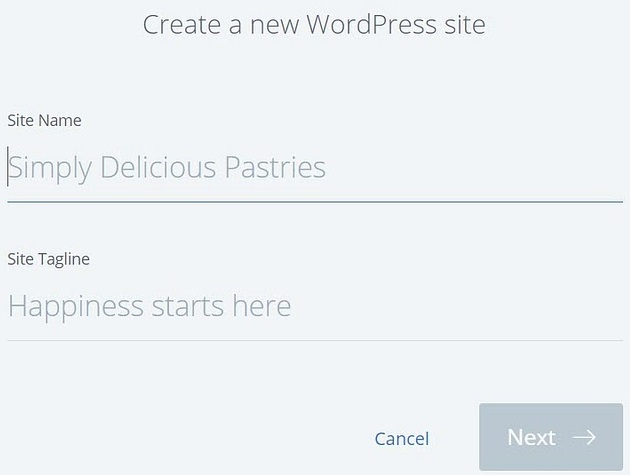
- Add your store’s domain name here.

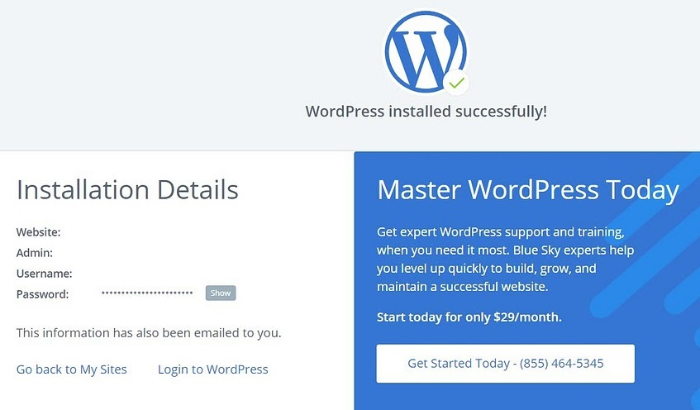
- And tada! You can log in to WordPress and notice that your site changes from Coming Soon to Active. Also, this is how your BlueHost installation appears afterward.
Manual Installation
Manual installation is often required when your hosting provider doesn’t offer one-click WordPress installation. You should download WordPress from https://wordpress.org/download/ and then upload it to your hosting dashboard.
Step 4: Set Your WordPress Backend – The Right Way!
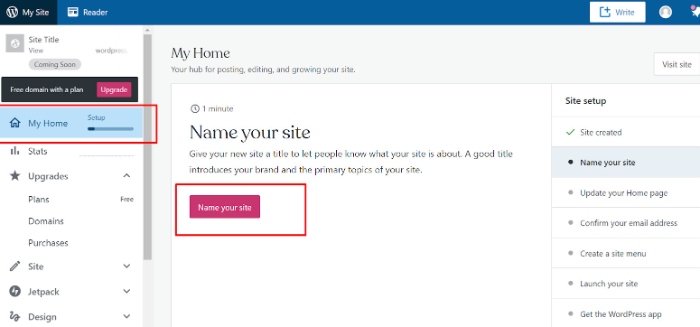
As soon as you log in to your account on WordPress, you will be prompted to your dashboard. First, let’s begin with naming your site. Know that site naming is different from your domain name and you can always change your site name.
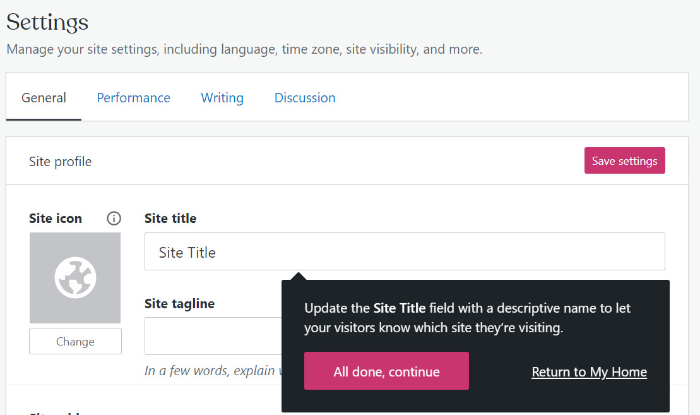
Let me quickly explain what the 3 terms mean.
- The icon is basically a favicon that you see
- The title is something that is displayed on top of your browser and visiting page
- The tagline is a short statement placed underneath your site title
Here’s an example:

Now that we’ve done the basis of site naming, let’s move towards ensuring a secure WordPress eCommerce website.
Setting up HTTPS to Use SSL
Your WordPress hosting package comes with a free SSL certificate, which is generally installed on your domain name. But remember, your WordPress site needs to be customized for HTTP to HTTPS conversion.
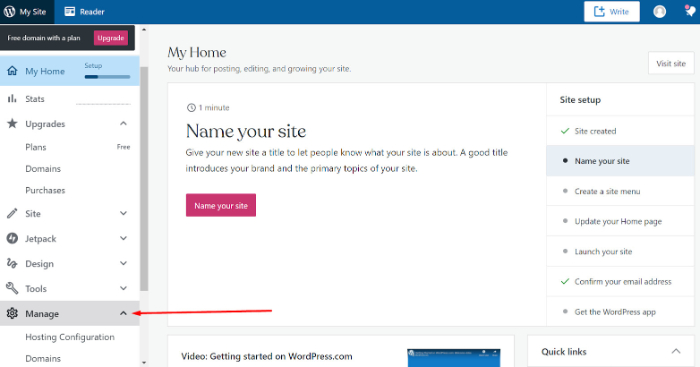
Click on the Manage » Domains, you wanna change your WordPress Address and Site Address to use HTTPS instead of HTTP.
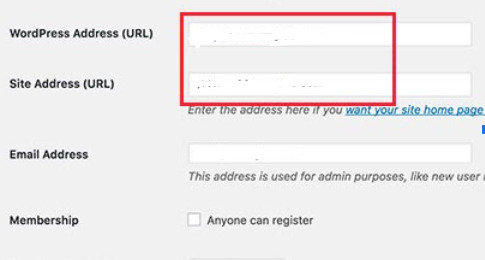
In the Site Address, add “https” before your domain. The most important reason for using HTTPS is that it builds trust amongst your site visitors and also secures all their transactions.
Step 5: Install An eCommerce Plugin from WordPress Plugin Section
WooCommerce is the best plugin you can use for your WordPress eCommerce store. It’s a free and open-source eCommerce software that simplifies selling products and services online. Its top 3 features are:
- Auto-detection of customer’s location so that you can simplify shipping and make tax calculations
- The mobile app makes it easy to manage your store from anywhere
- Enable guest checkout for those customers who don’t wanna register and reduce abandoned carts
Let’s quickly see how you can install and set up WooCommerce on your store.
How to Install & Set Up WooCommerce On Your WordPress
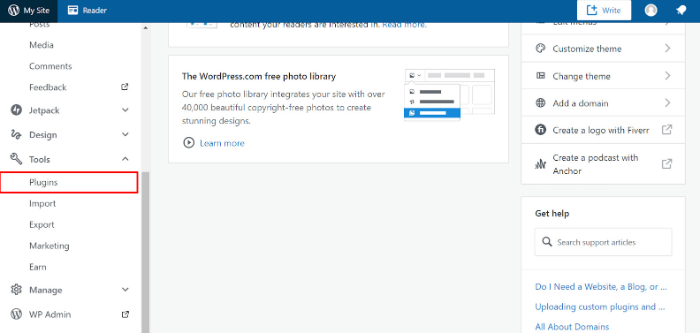
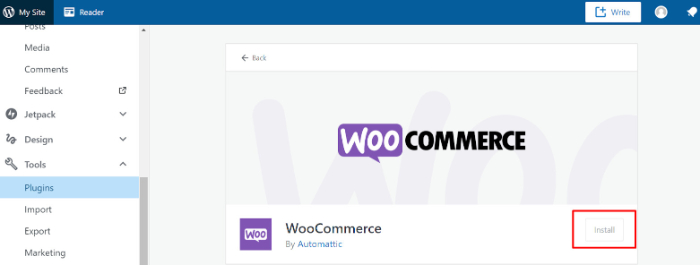
Let’s first install WooCommerce. To do this, visit the WordPress dashboard, click on the Plugins section and search for WooCommerce.
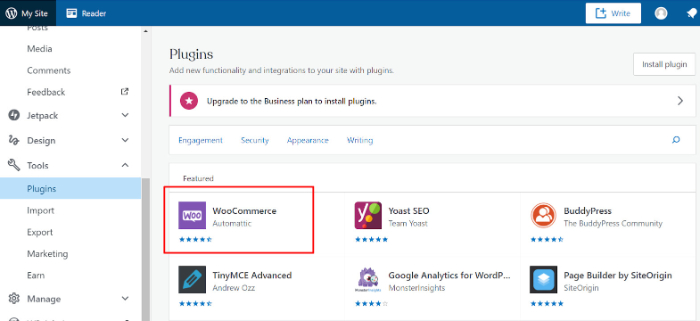
Now click on ‘Install.’ When it’s ready, you can see the ‘Activate button.’
When you click on it, WooCommerce will launch its configuration wizard, which is crucial in setting up your store’s settings.
Here’s a quick walkthrough of the configuration process of WooCommerce.
First, add in the basic store setup details.
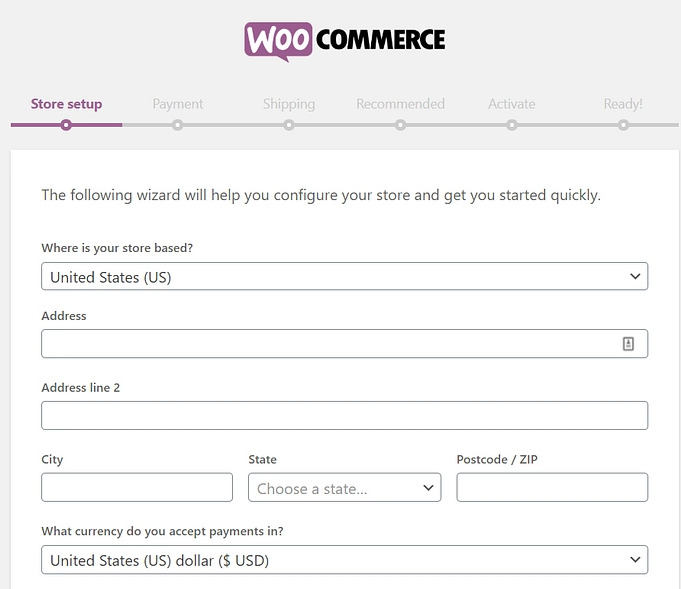
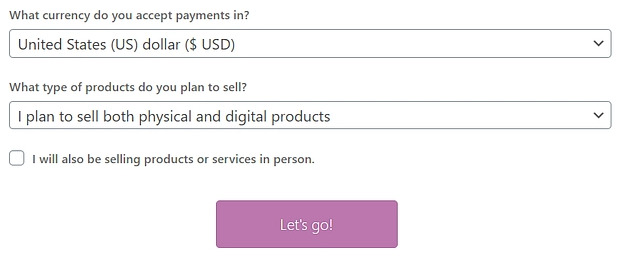
Add in your currency preferences.
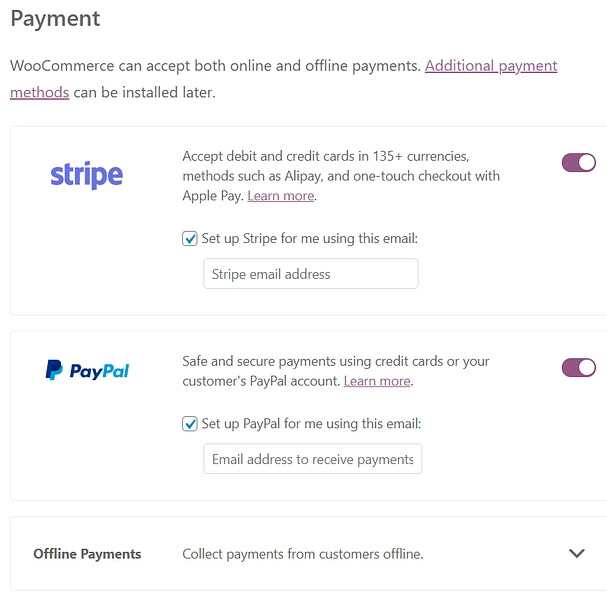
Fill in your Payment methods:
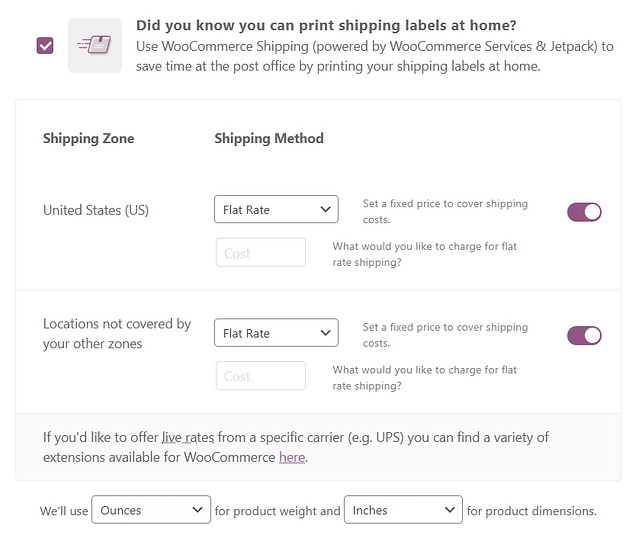
Fix your Shipping Methods and Shipping Zones:
Add the recommended extensions as you like.
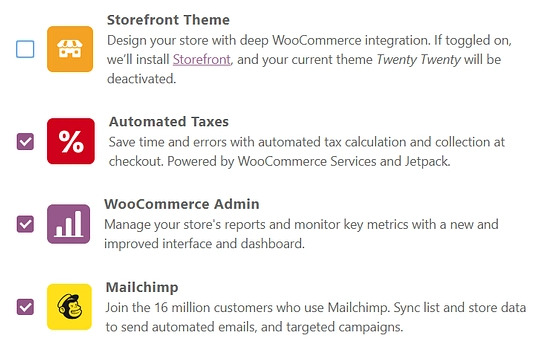
A quick summary of the steps:
- Install WooCommerce and access the setup wizard
- Select your payment providers
- Configure shipping zones
- Add recommended extensions
Step 6: Finalize A Theme for Your WordPress eCommerce Website
Your WordPress eCommerce store should be personalized and unique enough to catch the attention of your visitors. A theme acts as a design backbone for your web content.
Just because you picked a theme doesn’t mean your WordPress eCommerce store will be stuck with it. WordPress eCommerce themes (or any themes for that reason) are entirely customizable. You know, the HTML and CSS code of your WordPress can be edited according to your needs.
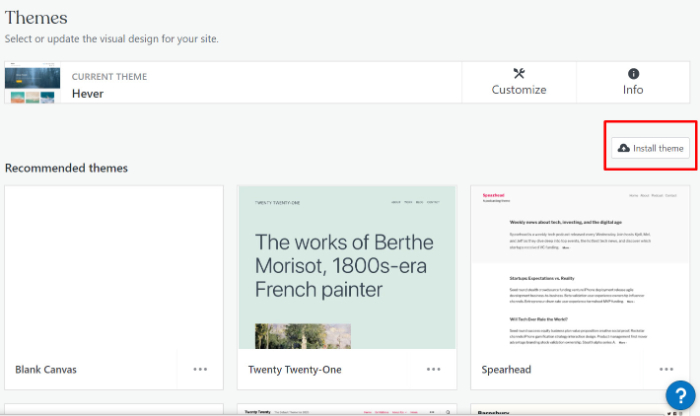
You can find numerous free WordPress eCommerce themes in the theme directory, which you can access through your dashboard:
- Go to your WordPress dashboard.
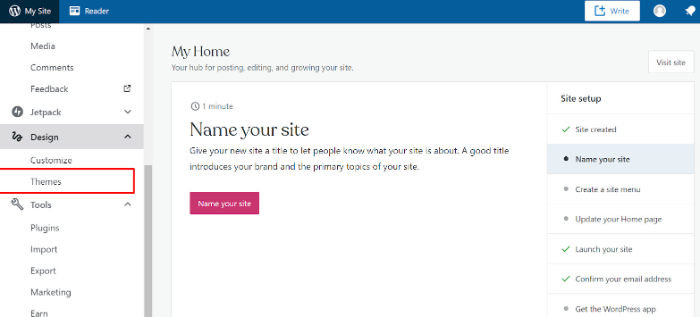
- Click ‘Design,’ and then click on ‘Themes.’ Here, you will see a dashboard for themes.
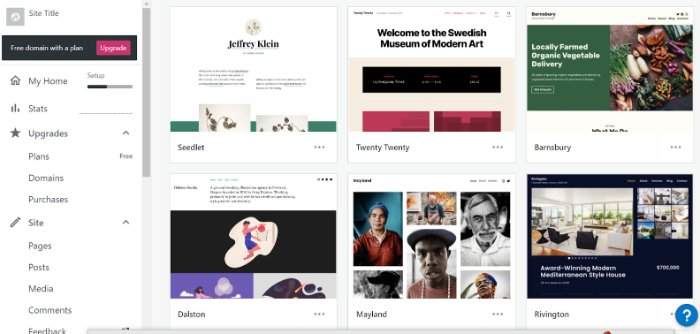
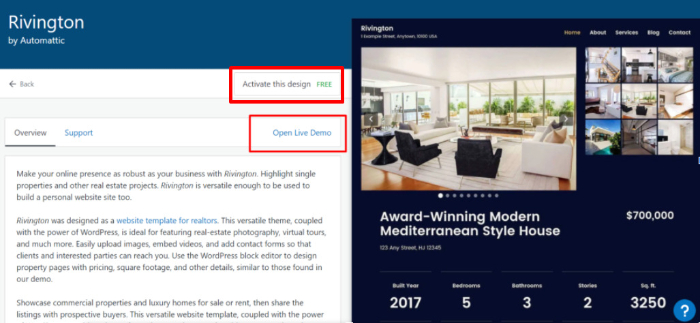
- Check a few themes out and select the one you resonate with.
- Click on ‘Open Live Demo’ and see how it looks on your website.
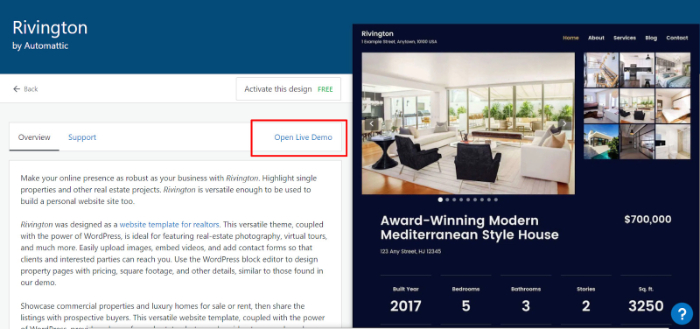
- If you like how it looks on your website, press the ‘Activate this design’ button and this theme is all yours!
If you don’t have the time to customize your storefront and are looking for the quickest way to set it up, your best bet is to choose a theme that looks as close to your desired storefront as possible.
You can purchase premium WordPress eCommerce templates from popular third-party sites like ThemeForest and Elegant Themes.
To install a premium theme on your site, make sure to follow these steps:
- Download a .zip file for the theme you wanna put.
- Go to Theme dashboard – Click on ‘Design’ and then press the ‘Themes.’
- Hit on the ‘Install Theme’ button and WordPress theme dashboard would pop up.
- Press the ‘Upload Theme’ button for obvious reasons.
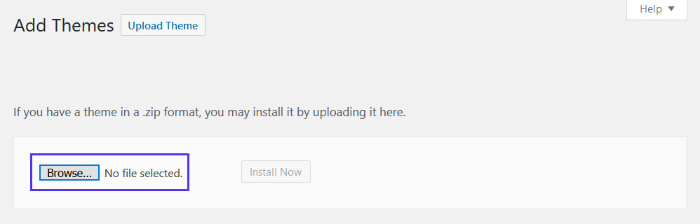
- Choose the .zip file from your computer.
- After this, there will be a success message with a link to activate the theme.
That’s it, you’re good to go!
Step 7: Add Products to Your WordPress eCommerce Website
Adding products to your WordPress eCommerce store mainly depends upon your store’s needs. Here are 6 popular product types offered by WooCommerce.
- Simple: A single item that you’re selling. Most products fall under this category for your WordPress eCommerce store. For example, a trench coat, a book, etc.
- Grouped: Usually, things that come in pairs or sets fall under this category. For example, 4 sets of sock pairs, dinnerware, and more.
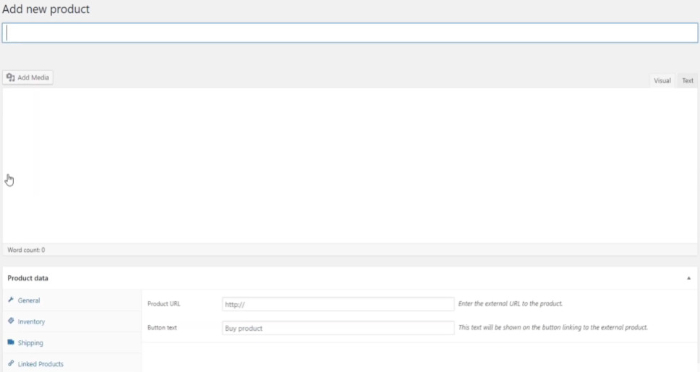
- External/Affiliate: You might use this option when you’re partnering with another brand to sell their products on your store. One that you list and describe on your website but is sold elsewhere.
- Variable: One product that varies in style. For example, a skirt that is available in polka, stripes, and plaid designs.
- Virtual: Products that don’t require shipping. For example, a service like 1:1 consulting. A virtual product will jump straight to checkout.
- Downloadable: For example, an ebook, digital album, PDF magazine, or photo.
I’ll do a demo to show how we can add products to our WordPress eCommerce website.
#1 Add Basic Details
Head to WooCommerce, click on Products, and Add Products. Fill in the Product Title and Description. Go to the Product Data panel, select downloadable (digital) or virtual (service) if applicable.

Fill up all the details you have in mind.
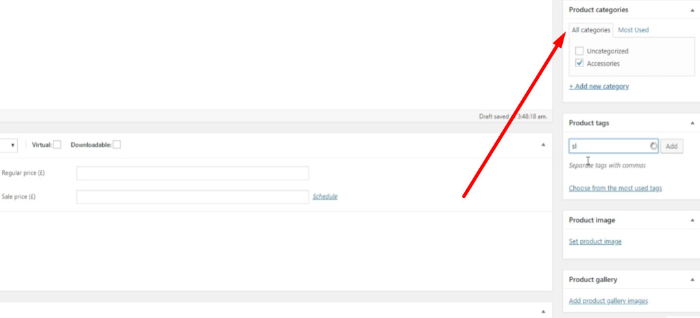
Add good product categories:
#2 Add Product Data
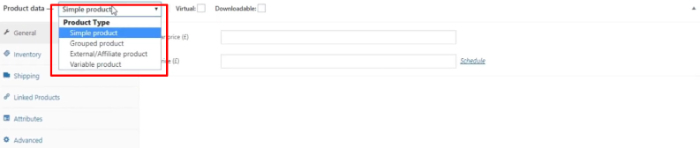
The Product Data panel holds the most important product features.
First, set the product type and select what you need from the dropdown menu.
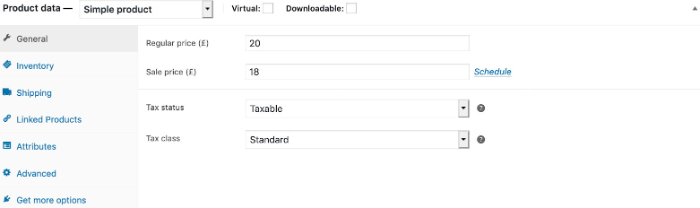
Add the pricing:
Click on Inventory:
Update details like SKU (Stock Keeping Unit), stock status, and more. Your SKU is a unique number and that is different from all of your post IDs.
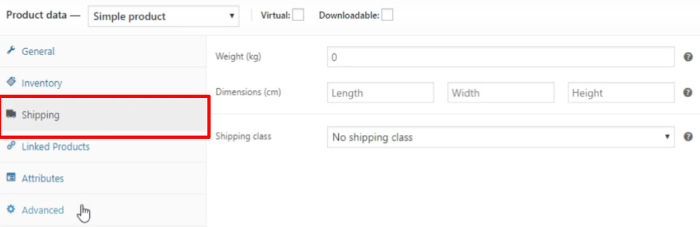
#3 Add Shipping Details
The physical characteristics (weight, dimensions, class) can be entered in the Shipping section.
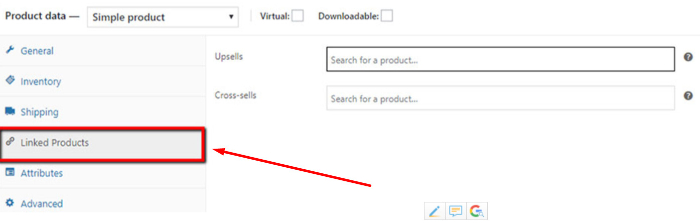
#4 Linked Products- Upsell or Cross-sell
Using the ‘Linked Products’ category, you can opt for the ‘Upsells’ option to make your product page feature the “You may also like” section with all the links of relevant products.
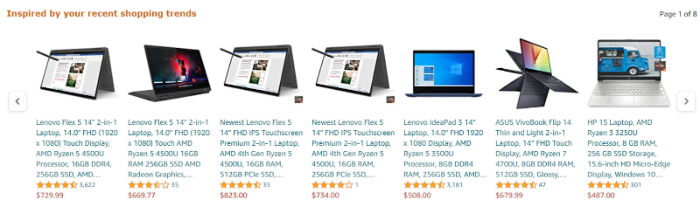
A popular example for your reference would be Amazon’s “Inspired by your recent shopping trends.”
Now that we’ve seen how powerful WooCommerce integration can be when it comes to adding products to your store, let’s look at the top 5 extensions for your WordPress eCommerce store.
Step 8: Install Other WordPress eCommerce Plugins
Let’s quickly check the top 5 WordPress eCommerce Plugins that are absolute for your store:
- Sucuri Firewall
Sucuri Firewall protects your WordPress eCommerce website from any malware, DDoS attacks, or brute force attacks.
Here are more than a couple of reasons that tell us why we need Sucuri Firewall:
- Acts as a wall that protects your site against malware so that your site and users information can be safe.
- Unlimited malware scans and cleanup
- Comprehensive processing to ensure top-notch security for your website
- Removes suspicious redirections and spammy links
- CSS Hero
Who said you had to be a designing and coding giant to create the perfect storefront. By installing the CSS Hero Plugin on your WordPress eCommerce store, you can easily customize your site’s look using its intuitive interface.
Why should we choose CSS Hero?
- Saved version history so that you can store snapshots of your edits without making the store designs go live
- Works like a drag and drop selector for editable elements
- Effective color management for your theme and the ability to instantly test background image uploads
- Apply on-scroll animations wherever you want
- WP Review
WP Product Review is a great WordPress eCommerce plugin for your store. It simplifies how your customer can add reviews and allows you to manage reviews.
You can even divide your customer reviews into pros and cons, images, and other factors.
Why should we use WP Review?
- Improve your website’s social proof displaying how trustable your store is
- Save your precious time importing features from Amazon
- Generate comparison tables from existing reviews in no time
- Envira Gallery
Envira Gallery is a hub to create stunning photo and video galleries for your WordPress eCommerce website.
How does the Envira Gallery augment your store’s outlook?
- Amazing social media integration to add share buttons, integrate your images with Pinterest, Instagram, and more
- Makes your gallery SEO-friendly using deep linking and pagination
- Protect your store’s creatives adding watermarks whenever needed
- Yoast SEO
Yoast SEO has to be on our list of top 5 WordPress eCommerce plugins for your website because of its versatile SEO options.
Why is Yoast SEO a great choice for your store?
- Analyzes the readability of any content written for your eCommerce store and calculates its Flesch Reading Ease score
- Tracks your store’s important pages and notifies you when these pages haven’t been updated for over six months
- Allows you to add synonyms and related keywords to your content
- Sets canonical URL to avoid confusing with Google regarding duplicate content
Step 9: Optimize Your Product Page
Your product page has to look professional and attractive to drive those sales. Around 90% of your first-time customers decide whether they want to buy from your store or not, depending upon your product pages.
Let’s see how you can create high-converting eCommerce product pages for your store.
High-Quality Product Images
Product photos create the first impression for your store and products. High-quality product images attract your visitors to explore your product further. Using Product Image Zoom-ins, you can optimize your product image experience.
Many branding experts recommend using a white or light-colored background for your product photos. In addition, light backgrounds maintain consistency and emphasize your product’s features.
Detailed Product Content
Your product page should be detailed. More importantly, it should answer most questions your customer may have in mind while browsing your WordPress eCommerce store.
Along with this, ensure that your product page ticks all these checkboxes:
- A catchy or straightforward product title
- Important features of the product
- Size / dimensions / capacity
- Price
- Material of the product
- Care and maintenance instructions
- Information about the brand
Optimize Your Product Page for Mobile Audiences
Millennials and Gen Z-ers are now increasingly purchasing using their mobile devices. You can lose a large chunk of traffic, sales, and revenue if you don’t have a mobile-optimized product page.
You can also design a mobile-optimized website using many WordPress eCommerce free templates. Most templates are also optimized for mobile audiences, so ensure that you pick a theme, keeping mobile-optimization in mind.
Clear Call-to-Action
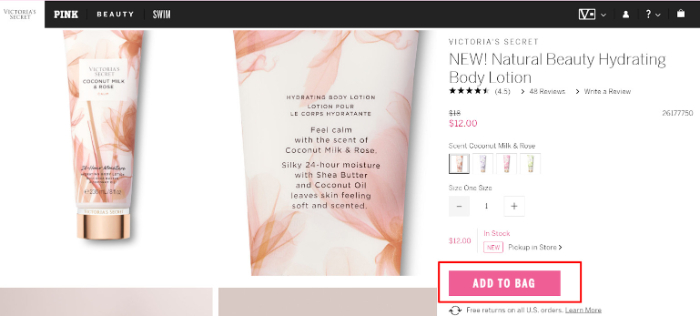
Use a prominent ‘Buy Now’ button and don’t add fancy CTAs that might confuse them. And when it comes to the text in your CTA, don’t overthink it and just put ‘Add to Cart’ or ‘Buy Now’ as these two convert the best!
Other than this, use colors that make your CTA button highly visible on your product page.
Here’s how Victoria’s Secret does it the right way.
Step 10: Set Up Your Payment Page with WooCommerce
You’ve done all the hard work for setting up your eCommerce store using the WordPress WooCommerce plugin. Here’s the final sprint. Let’s see how you can efficiently set up your payment page.
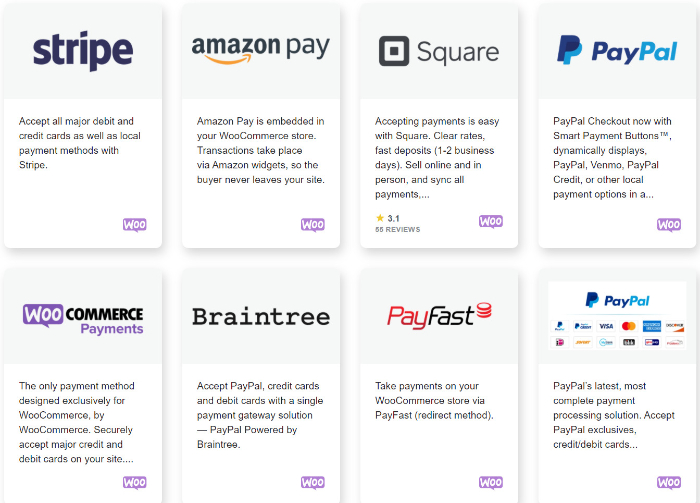
WooCommerce offers a wide list of payment integrations that you can use.
Here’s how you can set up payments on WooCommerce.
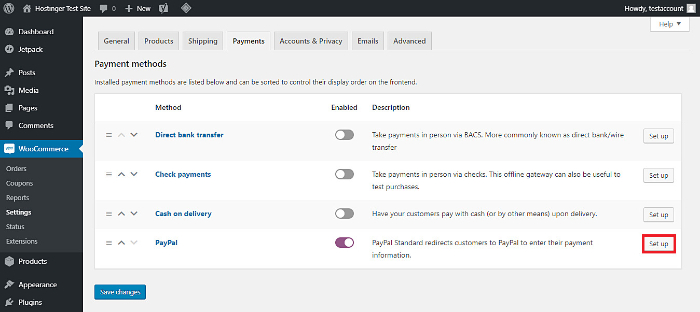
Go to your WordPress dashboard, select WooCommerce, and then click on ‘Payments’.
Find the suitable payment method, pull the button to ‘Enabled’ and click ‘Set Up.’
After all of this, you will be prompted to this page. I’ll demonstrate how you can set PayPal up for your WordPress WooCommerce store.
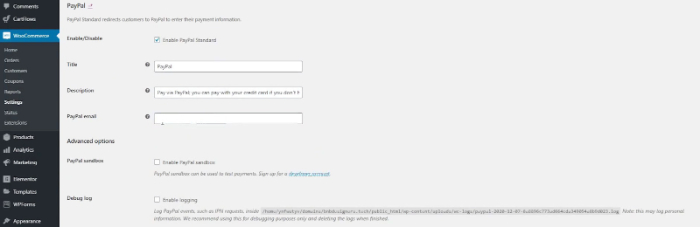
By default, the email you used for signing up to WordPress would be the one you entered in the ‘PayPal email’ box.
So, add your email linked to PayPal instead.
A point to note here is that you should generally have a PayPal business account as you’re setting up an eCommerce business.
Scroll down and add the same PayPal email address in the ‘Receiver email’ input box.
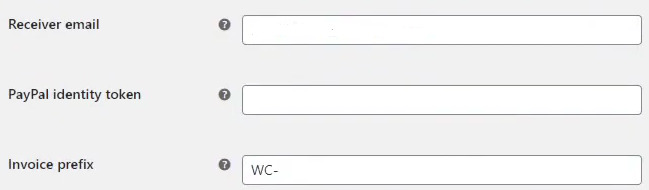
Visit your PayPal account and click on ‘Account Settings.‘
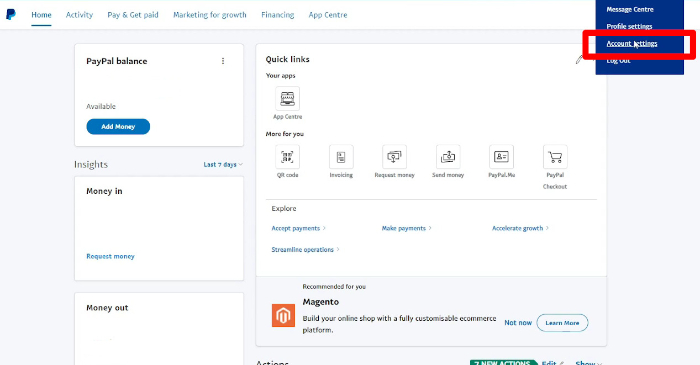
Scroll down to find NVP/SOAP API Integration and click on Manage API Credentials.

When you click on Manage API credentials, you will be prompted to this page. Make sure you don’t share these credentials with untrusted sources.
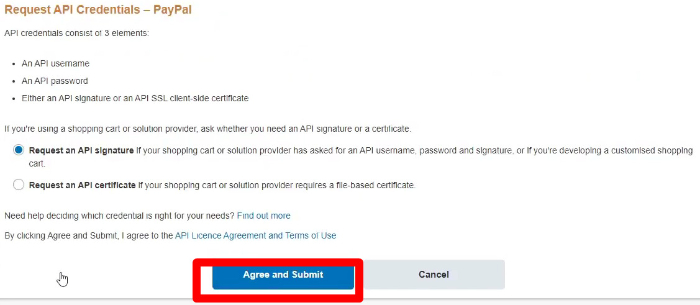
Click on Request an API signature and hit Agree and Submit.
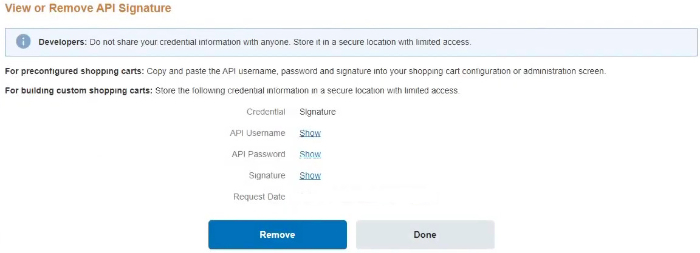
All done? Time to access your API signature.
Go back to your WooCommerce dashboard and copy credentials back to WooCommerce’s PayPal section:
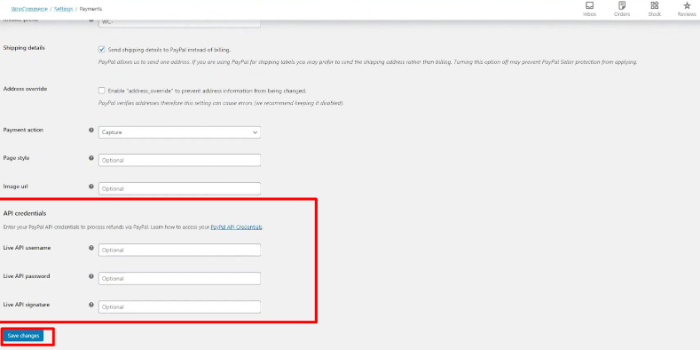
After adding the credentials, click on Save Changes.
And you’re done!
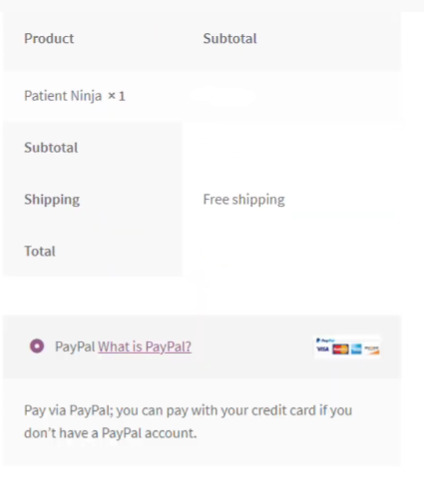
You can see PayPal in the checkout option of your cart. Therefore, we have finally completed the process of setting up a payment method for your WordPress eCommerce store.
My Advice!
WordPress is an amazing, power-packed, and robust tool that can help you design a comprehensive eCommerce store. It gives you a great flexibility to customize your store to match your branding and customer engagement needs.
But, such customization takes time. You will end up spending at least a week or two setting your entire WordPress eCommerce store up.
I understand that most of us might not have weeks to dedicate for building an eCommerce store. We have to juggle family responsibilities, workplace stress, personal well-being, all at the same time.
If you need a fast alternative to set your eCommerce store up, you can definitely try Shopify out. Shopify simplifies the entire process and you will have your store ready in about 3 days.
Choose either WordPress or Shopify based on your time commitments and business priorities. Don’t be afraid to experiment and have some fun along the way!